In accordance with the law, metering devices must be in every home. Therefore, we will consider in detail how to correctly install a meter for cold and hot water in an apartment, and for a private house for one owner (family), most of the proposed options are also suitable. We will pay maximum attention to all important nuances so that there are no controversial issues left for you.
Is it profitable to install it or not?
It depends on how many people live in the living space and how intense their daily (weekly, monthly) consumption is.
- Such changes will be a plus if there are exactly as many people as registered, or fewer, and/or if someone leaves regularly and for a long time, for example, on a business trip or to the country for the summer.
- It’s a minus if there are more inhabitants than indicated in the documents, and each of them actively, say, every day, spends tens of liters.
The specific amount that can be saved in the personal or family budget depends on the nature of the settlements with the provider (management company). Typically savings are 30-50%. Although there are also situations where the numbers in payment bills decreased several times: this happened during the transition from a general metering device to individual ones.
After installing water meters, the costs of a particular apartment are deducted from the total consumption of the house and paid for. Per month, even if you do not limit yourself to bathing and washing, they amount to approximately 5-6 cubic meters per person. By collaborating, you actually buy 16-20 - with a reserve - but do not spend them. This makes it clear which option is more profitable, especially in the long term.
It becomes a necessity. Over the next couple of years, all Russians should switch to the “you only pay for the liters you spend” format: such a decision by the authorities is designed to bring order to accounting and at the same time will perfectly relieve the pain of choice.
Device registration
How to register a water meter
Before installing water meters in your bathroom, you should contact your regional water utility to obtain all the technical requirements for the device. This is handled by a special department for coordinating water metering projects. Having received official permission, you can buy a water meter.
When purchasing a device, make sure of the following parameters:
- The serial number on the product must match the one indicated in the data sheet.
- The water meter must have a stamp of the State Standard on the seal.
- The technical passport for the product must contain the date of the official factory inspection.
Attention! At the time of purchasing the goods, the seller must put the official stamp of the store and also indicate the date of sale.
Water meter with seal
The new device should be checked by contacting one of the following organizations:
- Housing office.
- water utility management.
- private and licensed company.
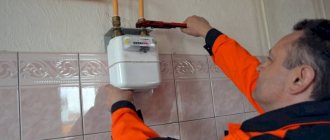
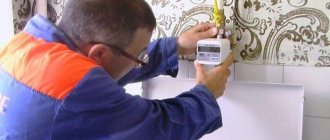
To perform the check, the device is handed in along with the registration certificate. At the end of the procedure, the official stamp of the inspection company will be added to the technical passport, and the corresponding fields will be filled in. At the same time, a sealing date will also be set.
Nuances of water meter registration
Please keep in mind that damaging the instrumentation seal is strictly prohibited, otherwise it will not be accepted at the water utility. If you suddenly damage the factory seal, the organization can still accept the water meter. However, if there is no instrumentation seal, then all device data will be invalid.
The equipment installation diagram describes in detail the sequence of installation of elements. There is nothing complicated here.
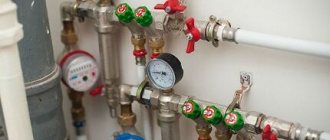
Typically, the “garland” looks like this: first comes a shut-off valve, then a special collapsible filter, followed by a water meter, and a check valve completes this “chain”.
How to install and connect a water meter, independently or with the help of third-party specialists
Installation is carried out at the expense of the apartment owner - that’s what the law says, and who exactly does all the work is not important. Let's consider both options, but first let us clarify that management companies still provide some services, and for free. So, the responsibility of the DEZ or the city water utility is sealing.
On your own
Firstly, this is completely real, and secondly, it is legal - not a single inspector should subsequently have questions about this. You only need to buy a suitable device model and components for it, and also agree in advance to turn off the riser at a time convenient for you. After which the order and procedure for installing water meters are reduced to the following simple scheme:
- direct installation and flow supply;
- calling a DEZ employee (or the appropriate authority) for sealing;
- obtaining a commissioning certificate;
- a trip to the office of the management company, registering the device, signing a standard payment agreement.
How to hire the right specialists and what kind of work they should do
You can find such masters through an advertisement on the Internet or request a list of them in the same DEZ. The second option is convenient because you will be given a list of licensed performers, that is, definitely professionals, whereas amateurs often offer their services on the Internet.
The main thing is to cooperate only according to the contract and carefully read the terms of the contract before signing. This document indicates all the important nuances: who provides the device and purchases spare parts, what specific actions are being taken, whether there is maintenance (previously, companies literally imposed it, but today you have the right to calmly refuse this service). If you are not satisfied with any item, do not hesitate to discuss it - you will pay for it.
After which, the connection of cold water meters in the apartment, and hot water too, occurs as follows:
- A representative of the contractor comes to your home (at a time convenient for you), conducts an inspection - evaluates pipes, photographs communications, and takes measurements. This is required to create an optimal scheme.
- He contacts the management company and agrees on a date for turning off the riser (check this point, maybe you will have to communicate with the provider).
- On the appointed day, the master arrives and performs the work (if desired, in your presence, within two hours), upon completion of which he issues the corresponding certificate and paper with the serial number of the device.
- You call the DEZ or a similar authority, a specialist arrives from there and performs a filling (attention, free of charge).
Pros and cons of self-installation
The advantages of self-installation are obvious:
- saving money on installation of devices;
- the ability to determine the date and time of installation at a convenient time for the owner of the apartment or house;
- independent choice of metering meter model based on ratings and reviews.
Disadvantages of DIY installation:
- risk of poor-quality installation of metering devices;
- increasing the likelihood of an emergency (especially in an apartment building);
- double costs associated with forced dismantling and re-installation of metering devices.
The owner must make a conscious decision: calculate the pros and cons of “home” installation of a water meter for hot and cold water consumption.
What types of metering devices are there and how do they differ from each other?
Before deciding what is needed to install a water meter, how to connect and secure a water meter in an apartment, you need to figure out what kind of model can be purchased, and which one is best suited for your case.
All their diversity is classified according to the following criteria:
- power source - volatile and not (in particular, tachometric);
- design and dimensions – separate and compact;
- number of pipelines for parallel service - single, double and multi-channel.
1.5 m3/h For process water
1.5 m3/h For process water
MBFT-75 Membrane for 75GPD
It so happens that the most relevant for us are devices that require constant recharge to operate. There are 3 fundamentally different types, each with its own characteristics, so let’s look at all three.
Induction (electromagnetic)
They are relatively expensive, but they have been used for more than 10 years, and are most actively used in the food (including brewing) and pharmaceutical industries, that is, in especially critical cases.
Although the scope of their distribution is most significantly influenced not by price, but by the highest requirements for the quality of the liquid. They are reliable, accurate and generally effective only when there is no rust, scale or other foreign matter in the flow passing through the riser.
In our realities, it is not even so important how to install a cold water meter correctly: installing an induction model without question is advisable only for direct intake from an artesian well, that is, for a private house. In other cases, it is necessary to constantly monitor the purity of the medium entering the pipeline.
Ultrasonic
They are even more expensive than induction ones, but they last up to 15 years, without interruption, and are highly accurate, so in the long run their price is well worth it.
Due to their service life, they are widely used in plants, factories and other industrial enterprises - they are productive enough to be used at large facilities. They are also used to measure the volume of wastewater. In everyday life, they are not used very often, because they have the same feature as electromagnetic models - they require that the collected liquid be free of mechanical impurities.
When considering how to properly install ultrasonic water meters, it should be noted that there are two types:
- clamp-on - for external installation;
- insertion - embedded in a pipe.
The second is in direct contact with the flow running along the communication line, therefore it is more accurate, but less reliable. The first one provides easy reading.
Based on the nature of their functioning, they are classified into 2 types - Doppler and time-pulse - but both options measure the speed at which ultrasonic waves pass through the liquid, and through it they find the flow rate, and therefore the difference between them is insignificant for consumers.
Vortex
Again, they are actively used in industry, but are considered irrational for domestic use. Therefore, we will not consider how to correctly install such water meters (water meters) in an apartment, but let’s say a few words about the principle of their operation, it’s interesting.
It records the number of vibrations caused by collisions of the medium passing through the system with obstacles. Having received this quantity, he converts it into volume and displays the results on the board.
In order for the device to measure collisions, a “tongue” is cut into a pipe with a flow running through it - a rod of a specific shape that creates a “Karman track”, that is, vortices of a suitable frequency, serving as the maximum accurate indicator of flow in liters (when converted).
And, separately and in detail, we should consider models that do not require constant recharge, since they are the most relevant for private use.
Non-volatile (tachometer)
Relatively cheap and compact, although not the most durable - they have a service life of 5 years.
Below we will describe step by step how to install a water (water meter) meter of this particular type, because it is not afraid of liquids with impurities, this is its main advantage.
There are two design options for its implementation:
- vane - the axis is located at an angle of 90 0 to the flow;
- turbine - the guide runs parallel.
SF-mix Clack up to 0.8 m3/h
SF-mix Runxin up to 0.8 m3/h
SF-mix manual up to 0.8 m3/h
The first can be placed on pipes with a diameter of up to 40 m; it can be used to measure flow rates of up to 15 cubic meters per hour. The second is on a line with a cross-section of 50-100 m, and it is 2-3 times more productive. The main thing is that both work in a similar way - they record the number of rotations of the moving element under the influence of the flow. Both can be single- or multi-jet, wet (their “tongue” is immersed in the medium) or dry (there is no direct contact).
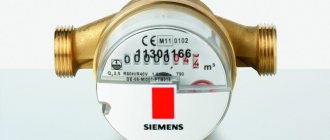
A few more words about how to install correctly: installation and connection of a water meter can be carried out separately for cold and hot water. For easy visual distinction, the first of them should be in a blue case and marked “SHV”, the second – in red, with the designation “SGV”. The operating temperature range is up to +30 0С and up to +130 0С, respectively. There are also universal models - they are made in orange and receive the abbreviation “USV”.
Tachometer models are best suited for homes due to their unpretentiousness and accessibility: buying them is not difficult, they are sold in all plumbing stores. Yes, they will have to be changed more often than induction or ultrasonic ones, but in terms of cost they are still more profitable.
Differences in mounting DHW and cold water devices
It is permissible to install a DHW meter on a cold pipe; in other words, it is permissible to install two red ones for hot and cold water.
Note the advice of practitioners! You can install both red meters, but for convenience it is better to separate them so that there is no confusion when collecting readings.
There are houses in which the hot water supply system operates according to a two-pipe system. To install a water meter on a hot water supply, you need a bypass valve. Otherwise, the meter will count excess water consumption.
For cold water meters, rubber gaskets are installed; for domestic hot water, the private owner must buy paronite gaskets.
What is needed to install water meters
Before starting work, you must:
- prepare a place for them - below we will tell you how to choose it;
- assess the condition of the pipes and, if they are worn out, replace them;
- make sure the complete set is complete - the device must be sold with a pre-cleaning filter, American nuts, and a check valve;
- additionally purchase gaskets and seals (FUM tape or tow are perfect for the latter);
- take all the necessary tools - plastic scissors, wrenches 14, 16, 18, iron for creating joints.
When purchasing the meter itself, you should check its number on board with the passport data, make sure that the documents have all the stamps, and also pick up the sales receipt and warranty card.
Stopcocks
If a meter is installed, special requirements are imposed on the root valve - it must have an “eye” on the outlet side for sealing.
Installing a seal will ensure that the user will not be able to disconnect the pipe and draw water without taking into account its quantity.
It should be noted that in some settlements water supply services can manage without this measure, so this issue should be clarified in advance. Also, sealing the tap is not required if the pipeline is made of polymers with permanent (soldered) connections.
Please note that not all taps are equally reliable. Avoid models with silumin parts, which tend to suddenly crumble . If this happens to the root tap, then by the time the user finds a way to turn off the water (in the best case, he will have to run to the basement, in the worst case, he will have to climb into a well on the street), it will have time to cause considerable damage.
Today, metal-plastic cranes are available for sale. As practice has shown, they are quite trustworthy.
In addition to the root tap, we recommend installing another tap - after the drain to the toilet cistern. If you have to turn off the water, for example, to carry out renovation work in the kitchen or bathroom, the toilet can be used as usual.
How to transmit readings
The results of actual expenses should be regularly provided to the management company. You can do this in one of 3 ways:
- fill out the subscription book sheet and place it in the receiving box;
- send an email to the contact email of the provider;
- leave it in your personal account on the website of this organization.
The specific option depends on the region, as well as on the policies and capabilities (modernity) of the DEZ or a similar enterprise.
Further actions
If the water meter is working normally and there are no leaks in the system, all that remains is to invite a specialist from the DEZ or Management Company to seal the water meters. To do this, we write an application to the desired organization and wait for the master. He must appear within 15 working days. If this does not happen, we write another statement. If the master does not install the meter again within 15 days in accordance with the requirements of the law, the meter is considered to be put into operation from the day the first application was written. To do this, you need to have a copy of it in your hands with the incoming registration number written in the corner.
If the master does come, he must seal the meter and issue a document confirming the commissioning of the water meter.
The document, together with a copy of the technical passport for the water meter, is provided to the DEZ, UK or ERC.
Procedure and rules for installing water meters in an apartment
- Shut off the supply in the riser, warning your neighbors and submitting an appropriate application to the management company.
- Choose a layout and location of the device - horizontal or vertical.
- Connect the shut-off valve to the pre-filter (coarse filter), pointing the latter's pipe downwards with the mesh.
- Assemble the device using plumbing winding in the process.
- Treat the joint points with mastic or lay FUM tape there.
- Check the front side to ensure that the directional arrows marked there coincide with the movement of the flow.
- Make sure that all elements are completed in the correct order - faucet, cleaning filter, counter, return valve.
- Prepare the communication line - remove a section of pipe of suitable length, draining the remaining liquid into a pre-prepared container.
- You make a thread on this section or connect a fitting to it.
- Plug the device into the communication line.
- Seal and seal the joints with tow and FUM tape.
And one more thing is needed to install water meters: the procedure in the instructions is as detailed as possible, but for commissioning you need to move on to the next step.
Selection of counters
Modern water meters are quite diverse in design and characteristics, but the most widespread in our country are only two varieties: mechanical and electronic.
Mechanical or tachometer
The simplest and cheapest device in which there is an impeller or turbine rotated by the flow of water.
The rotation is transmitted to a mechanical scoreboard, consisting of several rollers with numbers.
The cheapest ones are wet-type tachometer counters, in which the gear mechanism of the display is in contact with water.
But such devices can only be installed on water pipelines with high water quality.
Otherwise, you will have to install a more expensive dry meter, in which the display mechanism is placed in a waterproof chamber, and rotation is transmitted from the impeller through a magnetic coupling.
Mechanical counters provide sufficient accuracy and are very reliable. The average cost of the device is 400 rubles.
Electronic
These devices have a reed switch installed next to the impeller, which sends electrical signals to the processor.
There are plenty of advantages to meters of this type:
- Special models can separately count volumes of water at different temperatures (if cold water flows in the pipe instead of hot, the owner will be able to pay for it at the appropriate rate).
- There is an output for remote data transfer.
- Only the upper part of the device needs to be submitted for verification, and everything that is screwed to the pipe remains in place.
- The devices operate stably at low pressure and under conditions of significant pressure drops.
However, due to the significant cost (about 2,000 rubles) and dependence on power supply, electronic meters are installed in our country only in houses connected to a centralized water consumption metering network.
When choosing a water meter, pay attention to the following:
- Purpose (permissible water temperature): separate types of meters are produced for cold water supply and domestic hot water supply. Devices for hot water are more expensive due to the use of heat-resistant materials (operating temperature up to 150 degrees). It is prohibited to install cold water meters on a “hot” pipe. Instead of two water meters, you can install one universal one, connected simultaneously to both hot and cold water supplies. Such a device will cost less than two meters separately.
- Installation type: Many models today can be installed either vertically or horizontally. But there are also those that can only be mounted in a certain way.
- Availability of certificates: do not forget that the meter still needs to be put into operation, and water utility workers will not accept anything that comes into use. Even if the device turns out to be operational, the lack of a certificate will cost additional costs.
- Equipment: the better the meter is equipped, the less you will have to spend on additional purchases.
Ideally, the following items should be supplied with the device:
- ball valve;
- coarse filter (do not use a plastic flask);
- check valve
Gaskets, nipples and connecting parts are a must.
In addition to the hardware, the box should contain:
- passport of the manufacturer with “live” stamps and indication of the product registration number, service life, production dates and factory verification;
- installation and operation rules;
- warranty card.
The meter itself must have a factory seal.
Be sure to check whether the numbers in the passport and on the flow meter body match. If not, the device will not be accepted for operation.
Sealing and receiving documents
You should invite an employee of the management company, DEZ or city water utility to check the correctness of the work and block unauthorized access to the equipment.
To do this, you will need to submit an application (in writing), and the sooner the better - to save money, in order to move to a new, profitable payment scheme for consumed liters as quickly as possible. Your application will be reviewed within 3-5 business days, after which an authorized representative will be sent.
Attention, this specialist must provide all his services free of charge, and he does not have the right to request a license from the master who completed the task, tell him how to properly install a hot water meter in an apartment, or in any way question the professionalism of the performer. If the work is done correctly, and there are no signs of tampering or damage on the device, he is obliged to make a seal and draw up a commissioning report and enter testimony into it.
Well, the entire procedure ends with the conclusion of a contract with the management company.
What to do after?
The final stage after installation is a mandatory performance check. To do this, perform the following steps sequentially:
- turn on the water supply;
- gradually open the ball valve;
- check if there is a leak.
If everything went without a water leak and the meter is working normally, they call a Vodokanal inspector . After the inspection, the water meter is sealed, registered and marked in the device’s data sheet.
The private owner must receive a document confirming the acceptance of the device into operation, a technical passport with a mark on the date of the seal. Calculations of meter readings are carried out from this day.
You cannot install the seal yourself or invite private craftsmen . The sealing procedure is carried out after an official application for acceptance of the device for measuring water flow.
Important! Until registration has been completed, water meter readings cannot be taken to calculate the cost of water supply services. It is better to do the procedure immediately after successful testing of the metering design.
Nuances and subtleties
When thinking about how to properly install a water meter in an apartment, when purchasing it, do not forget to check that the numbers match - on board and in the documents, - the presence of a certification mark and the date of inspection at the factory. Be sure to take your receipt to ensure you can return it under warranty in the event of damage or malfunction.
Legal aspect
In the current legislation of the Russian Federation there are no prohibitions on installing water meters with your own hands. True, there are some important points here:
- Meters must be purchased from licensed companies. You must receive a technical passport with the device.
- Self-installation of the device requires temporarily shutting off the water supply throughout the entire riser, and this is unlikely to be done on your own.
If you installed a water meter, then any malfunction will be solely on your conscience.
By what criteria to choose
Here are the factors to consider before purchasing:
- pipe material and their general wear;
- the purity of the liquid consumed, the presence and concentration of insoluble particles and fine suspended matter in it;
- total budget - the money you are willing to spend on such a purchase;
- nature of operation - when deciding how to install a water meter correctly, do not forget that to measure a cold one, you need one, and a hot one, another, because the first one will not withstand the same temperature as the second one.
What is included in the installation package?
Based on Federal Law No. 261, Article 13 states that all energy resources used are subject to mandatory accounting using special instruments. Filling out an application for installation of a water meter requires the following documents:
- Application for installation (a sample is available on the Internet).
- Passport and a copy of all pages.
- Document on the ownership of housing.
- Site plan or technical specification.
You can install the water meter yourself or with the help of any installer company. this activity is not licensed, and in order to seal the meter, you will need to draw up an acceptance certificate, which must contain the personal data of the owner, information about the contractor and the technical characteristics of the device. The document is signed by three parties: the owner, the foreman and the head of the service company. In addition to the act, you must have the following papers on hand:
- Technical passport of the meter.
- Verification certificate.
- Installation Agreement.
- Standard maintenance contract.
The entire package of documents must be submitted to the information and settlement center, MFC, house service company or water utility to register this meter and calculate subsequent amounts according to monthly readings legally.
Possible problems during use and methods for solving them
Over the years of operation, the following malfunctions may occur:
- A decrease in pressure passing through the device - most likely, they are caused by a clogged filter. You should call the management company to send a specialist who is obliged to carry out free cleaning. Just wait for it, don’t try to fix it yourself.
- The seal has come off - notify your provider immediately. An expert from DEZ or a similar company will come and inspect everything: he knows how water meters should be positioned correctly, what condition the means of preventing free access must be in - in general, he will understand the situation. Yes, you will have to pay for re-sealing, but it is still cheaper than a fine.
- The readings were no longer recorded - it was almost certainly due to a broken rotor mechanism. Again, you can order an unscheduled inspection - it is performed once free of charge, if the warranty has not yet expired.
Such a device is not only necessary, but also very useful, because it allows you to pay only for the volume that you consume, and not depend on the total consumption or dishonest neighbors. And this is especially important now, with the systematic rise in prices of utilities.
Now that you know how to assemble, install, and install cold and hot water meters (meters) in an apartment, you can decide whether to do this work yourself or entrust it to specialists. You will find suitable equipment in our online catalog.
How to install correctly: step-by-step instructions
Before starting installation work, the private owner needs to write an application to the local Vodokanal office.
After receiving the technical specifications for the water meter, a model is selected and an metering device is purchased. They check the presence of the certificate and seal impressions.
It is necessary to have water meters checked by the Vodokanal management, private licensed companies or the Housing Office.
The meter is left with a technical passport, in which, upon successful verification, all fields are filled in and the organization’s stamp is affixed. Indicate the day of the upcoming seal on the device after installation is completed.
The meter has an instrumentation - seal. Its safety is a guarantee that the water meter will be accepted by Vodokanal. There are situations when the plant seal is broken, the water meter will be taken to the instrumentation, but without the latter’s seal the indicator data will not be taken into account for calculation.
The principles of installing a water meter in a private house and apartment are largely similar. Let's look at them.
Mounting kit
To install the device you need the following parts:
- Stopcock. Brass ball ones are more often used, if the pipeline is made of propylene, a plastic tap is installed. It must be new and of high quality to eliminate the risk of failure. The private owner must control the position of the shut-off valve. Two positions are allowed: “open”, “closed”. If it is not fully opened, it will quickly wear out and fail.
- Water purification filter with a mesh for large contaminants. There are two types - right angle and oblique. Periodically, the mesh needs to be cleaned of accumulated dirt.
- Check valve. So that the device does not start to “wind” back in a situation where the water supply to the system has stopped.
- Water meter.
For installation, the private owner independently purchases a check valve for each pipeline. To make the connection airtight, sealing materials are needed.
It is more convenient to use TangitUnilok threads with lubricant made from silicone, paste, or flax, tow. Connecting elements - fittings - will be required to make the transition from metal to metal-plastic.
Special tools required:
- scissors for cutting pipes made of metal or polypropylene,
- “iron” for welding joints and a set of keys.
If work is carried out with metal pipes, you need a grinder and equipment for cutting threads.
How to determine the location?
There are general rules for choosing a location:
As close as possible to the point of pipe entry from the main. The site is chosen horizontal to prevent water intake past the device. The place of attachment is determined so that the inspection services do not have unnecessary suspicions.- In an apartment, a meter is often installed near the toilet; if pipes pass inside the floor structure, the water meter is mounted in the bathroom.
- For private housing construction, the water meter is installed near the outer wall at a distance of no more than 200 mm from the exit point of the pipeline.
- If there is a well in the area with a pipe leading out from the main, a major installation is carried out. The well is covered with a lid (metal) and sealed. Unsealing is possible in case of fire or emergency. In other options, the seal is removed only in the presence of an official from the Vodokanal.
The water meter will be able to give correct readings if the risk of turbulence flows is reduced. Before the counter 45 mm, after - 15 mm. It is mandatory to install a valve in front of the metering device to shut off the water supply.
Installing a water meter
After purchasing all the necessary parts and components, proceed directly to installing the water meter.
The installation procedure includes:
- It will be easier if all the parts are lined up in one line , starting from the check valve and ending the chain with a shut-off valve. The manufacturer provides arrows, check that their direction is the same.
- It is recommended to make a “dry” connection in order to calculate the number of turns in advance. Usually there should be up to 5 pieces. During installation, remember the position of each element. Then they unwind it, take the sealing material, and wind it onto the faucet filter with the required number of turns. The sealant is placed so as to cover the entire thread.
- Shutting off the water supply . It is necessary to completely turn off the liquid supply through the main water supply. If it is not possible to close the outlet from the riser, it is necessary to block the flow of media through the cold and hot water risers.
- After completing the connection of all elements, insertion is carried out . For an apartment building, you need to call an inspector from Vodokanal in advance. The installer measures the length of the structure. An equal distance is cut off on the pipe; it is better to place a water container at the bottom.
- Fastening the structure to the pipe. If the pipe is made of metal, you need a thread and a clear measurement of the length to cut the excess section. It is easier to mount the meter on polypropylene pipes. Additionally, fittings are required to make connections between different materials.
Visual installation instructions can be seen in the video:
Direct installation is not so complicated and does not require time. The most difficult thing is to go through all the approvals and obtain documents for permission to install water meters.
Video description
The video shows how to correctly replace the meter and what to do with the documents:
And finally, one more recommendation. After installation is completed, it is necessary to test the assembled unit. To do this, one tap is opened inside the house or in the yard. Then you need to open the shut-off valve in the well a little. It is not recommended to open completely immediately, because water hammer may occur in the water supply network. In this case, there is always a possibility that the meter will fail due to the impact.
As soon as the water displaces all the air from the water supply, that is, it begins to pour out of the tap, you can open the valve completely. First, the unit is checked for leaks. Secondly, they look at the pressure from the tap. Usually, if the unit is assembled correctly and there are no serious leaks, then the pressure will be optimal.
And one last thing. All metering devices are subject to inspection after a certain period of operation. This is indicated in the product passport. So, you cannot remove the water meter yourself, and therefore remove the seals. This must be done by a representative of the water supply organization. The most interesting thing is that dismantling and installation is a paid service. Yes, and checking can cost you a lot. Therefore, many owners of private houses purchase a new meter and install it instead of the old one. It turns out cheaper, and the procedure itself is simplified - you don’t have to take the device to a workshop and wait for it to be checked.