Important nuances when laying country wiring
When planning the installation of electrical conductors in a suburban area, you should decide on the scope of work. A full replacement or restoration of the existing network can be carried out. In any case, it is recommended to follow the following rules:
- Distribution boxes, electricity meter, switches and sockets should be located in easily accessible places.
- Switches must be installed so that they are not blocked when the door leaf is opened. Switches are installed at a height ranging from 60 to 150 cm.
- Sockets are installed at a sufficient distance from the water supply system and heating devices at a height of at least 50 cm from the floor.
- Power wires to sockets are supplied from bottom to top, and to switches - from top to bottom.
- Direct connections of copper and aluminum conductors are not allowed.
- It is necessary to exclude the location of sockets in rooms with high humidity (bathrooms and restrooms);
- The wiring must be laid according to the prepared diagram, which is recommended to be saved.
Placing distribution boxes in a wooden house
All work is carried out in compliance with safety precautions.
What is needed to conduct electricity
In order to conduct electrical communications to your own site, you need to perform a number of actions in the following order:
- Visually find a nearby electrical network. It is best if it is a 380 volt network, which looks like 4 conductors on poles. If such a line is not detected, then a 6 kV network may be located nearby, which looks like 3 conductors on more “solid” poles.
- Determine the owner of the electrical network. First of all, you should ask your neighbors about this, especially those who have recently dealt with a similar issue.
- Contact this organization and apply for connection.
- Conclude a service agreement with the organization.
You can find the necessary information on the Internet. It is better to search at the address where the land plot is located, which will help you find an organization engaged in the sale of electricity in a certain territory.
Each site is serviced by one company. Difficulties can arise only when the plot is located on the border of the service areas of two electricity supply companies. In this case, you need to contact the organization whose pillar is closer.
When submitting an application, you need to find out whether there are technical conditions for connection. You can clarify the information only with the organization that will be involved in the sale of electricity.
Problems caused by the location of the summer cottage
Most holiday villages are located outside the city. At the same time, old power lines are usually used to power them. They are not designed to withstand large flows of electrical energy that arise due to the use of a variety of household appliances. This is accompanied by periodic interruptions in electrical networks, which can lead to failure of equipment installed at the dacha. To eliminate this problem, you will need to use highly sensitive circuit breakers and voltage stabilizers.
Voltage stabilizer for a private home
The condition of the wiring of a summer cottage is strongly influenced by the frequency of stay in it. This fact must be taken into account when choosing a wiring method, since without heating in winter, moisture will accumulate inside the room. Oxidation of the contact connections will gradually occur, which will lead to a short circuit, and as a result, the need for restoration work.
Important! Taking into account the fact that the dacha plot is private property, the owners must take care of the installation of the grounding loop and lightning rod themselves.
Change No. 1: is it possible to arrange an offline connection, bypassing SNT?
Summer residents now have the opportunity to connect to power grids directly by concluding a separate agreement with the power company.
This will allow you not to depend on other members of the SNT and not to undertake obligations to pay the debts of defaulters. In order to create an offline connection, you must:
- find out the name of the electricity supplier for the territory of a particular SNT and submit an application to them for concluding an individual electricity supply contract;
- Attach to the application confirmation of membership in SNT (certificate or gardener's book), as well as documents on the technological connection of SNT to the power grid;
- contact the network organization with a request to install an electric meter.
The Ministry of Energy reminds that from 2021, at the request of consumers, network operators are required to install individual electricity meters (letter of the Ministry of Energy of the Russian Federation No. 09-409 dated 02/05/2021).
The ConsultantPlus system contains a form for the minutes of a meeting of the SNT board on concluding an agreement with organizations supplying heat and electricity, water, gas, drainage, landscaping and protection of gardening areas... Get free trial access to K+ and proceed to the document.
What type of wiring to use at the dacha
To determine the best option, you should familiarize yourself with each of them separately. At the dacha you can use open and closed wiring. Each option has its own pros and cons that must be taken into account for the final choice. There are also differences in installation.
Open gasket
This option involves an open arrangement of cable lines (CL) directly on the walls of the dacha, including on top of finishing materials. Special protective boxes can be used, which are made in different colors. This will allow you to match the elements to the color of the design. The main advantage of open wiring is quick installation. There is also the possibility of trouble-free troubleshooting and installation of additional power points.
Open wiring in cable channels
The only negative point is the aesthetic side. All installed wiring is visually accessible, which some owners of country estates may not like.
It is rational to use open wiring in dachas that are used exclusively in the summer.
Hidden gasket
It is impossible to use this wiring option in dachas with wooden walls without finishing. Closed wiring involves laying cables in grooves, which are subsequently hidden under a layer of plaster. This will require more time and effort, but you will be able to achieve an aesthetic appearance.
Closed wiring is accompanied by increased safety. But in case of damage to individual supply cores, it is necessary to remove the finishing layer.
Hidden electrical wiring device
Cable entry into the house
The cable is introduced into the building through the wall or through the foundation.
In the first case, in the wall and a fragment of a pipe - metal or plastic - is installed. A cable is passed through it.
In the second, a hole is drilled in the foundation. Here, only a steel pipe is installed, insulated on both sides with non-flammable material and fixed with concrete. Then pass the cable through the pipe. Inside the building, a hole is drilled in the floor. Install a tube of smaller diameter and pull out the conductor.
Concrete floors are difficult to drill. In this case, it is better to introduce the wire through the wall.
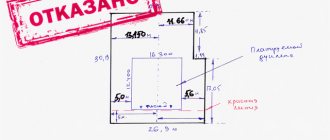
Preparing the wiring diagram
To draw up a power distribution diagram at your dacha, you can use two options:
- classic - using a regular pencil and paper;
- modern - using specialized computer programs.
When performing work, it is not necessary to comply with established norms and rules. It is enough to accurately display the installation locations of switches, sockets, lamps, equipment, junction boxes, as well as the location of cable lines. It is first recommended to draw a schematic plan of a country house.
Electrical wiring diagram in a country house
Paperwork
To connect a site without buildings to electrical networks, a standard package of documents is required.
It includes:
- the applicant's civil passport;
- a certificate confirming the applicant’s ownership of the land plot;
- plan diagram of the territory of the land plot with the designation of the nearest power line poles;
- plan diagram of the territory of the land plot indicating the location of utilities.
If documents are submitted by a third party, a power of attorney to perform the relevant actions must be attached to the list of main papers. Based on the submitted documents, the network organization will issue technical conditions according to which all further work will be carried out.
Determination of design loads
After drawing up a preliminary wiring diagram for a suburban estate, you should begin calculating the load. To do this, you will need to take into account the power of all electrical appliances, as well as lighting lamps. To minimize costs for cable lines, it is recommended to divide electricity consumers into several groups. The formation of groups is carried out taking into account the location and type of equipment.
With the correct calculation of the loads, it will be possible to avoid current overloads of the cable cores, and, accordingly, damage.
Load distribution among consumer groups
How to connect to electrical networks - pressure levers
The law regulates the rules for supplying electrical energy to the boundaries of consumers’ land, but in some cases the applicant may encounter some problems:
- failure to issue a contract by the electricity network;
- violation of technological connection deadlines;
- refusal to accept the application.
Combined boilers for wood and electricity are optimal for a country house, read on.
Basic connection diagrams for heating radiators in a private house https://klimatlab.com/otoplenie/sistema/skhemi-podklyucheniya-radiatorov-v-chastnom-dome.html
Any applicant must know their rights and obligations of energy supply organizations , and also be guided by current regulations:
- the electrical network must be stretched no further than 25 m from the boundaries of the site;
- commercial value applies to cases outside the established norms;
- working rules are regulated by Decree No. 861.
Any activity of an ESO that goes beyond the law, including violations of work rules, is suppressed by the antimonopoly services and threatens the organization with a large fine.
Selection of the required cable cross-section
After determining the loads of all supply lines, you can begin to select the cross-section of the current-carrying conductors. To do this, it is necessary to divide the calculated rated power by the network voltage, which will determine the current value. Based on the obtained value, the cable line section is selected using tables PUE 1.3.4 and 1.3.5. Using the first, conductors with aluminum conductors are selected, and the second, with copper conductors.
Table PUE 1.3.5 permissible cable currents
The required length of the conductors can be approximately determined from a previously prepared diagram.
What connection methods are there?
At the moment, the most commonly used method is overhead connection from a pole to a power line . But it is also possible to conduct light to a private house using an underground method. In principle, both are suitable for connecting to power grids, but air is more often used.
Underground construction usually costs significantly more, and from a technical point of view it is more complex . Cables are laid this way extremely rarely.
Read also: Power transmission line security zone: what you need to know before buying a plot
Options for supplying power cables from power lines
In the process of installing electrical wiring at the dacha, the owner will certainly be faced with the question of how to connect the power supply to the household. The cable line will need to be pulled from the nearest overhead power line support, naturally after obtaining the necessary permits, together with representatives of electrical network services. You can use one of the following options for connecting to a power line support:
- by air;
- underground.
Supplying a cable to a country house by air
Next, we will consider in detail the advantages, disadvantages, as well as important installation nuances for each of the options.
Air supply
Supplying power to a country house by air can be done using two methods. The first involves the use of SIP cable, which means self-supporting insulated wire. It stretches directly from the power line to the facade of the house. The second option is accompanied by pre-tensioning of the metal cable from the support of the centralized electrical network to the walls of the house using special hooks or talpers. This allows you to use any cable cables that are subsequently fixed to the cable.
Regardless of the chosen method, you will need to use additional insulating fasteners to secure the conductive wires. The following factors will need to be taken into account:
- If the distance from the power line support to the construction site is more than 25 meters, intermediate support pillars should be installed.
- In winter, the load on the wires will increase due to the accumulation of ice. In this regard, it is necessary to correctly calculate the load-bearing capacity of the cable.
- Ultraviolet radiation contributes to the mechanical destruction of the insulating layer of conductor cores. Therefore, it is necessary to use additional protection in the form of corrugation.
Standards for connecting a house to a power line
Connecting electricity to a country house from a pole via air is carried out in the shortest possible time. You will need to purchase special fasteners and also use a tower. This comes with additional costs.
Power supply underground
When powering a country home with a cable laid underground, it is recommended to adhere to the following rules:
- The wires are laid in a trench at least seventy centimeters deep. Except for the case when the cable line is laid in a protective pipe, and the length from the power line support to the input panel is less than five meters. Under such conditions, it is possible to prepare a trench 50 cm deep.
- The trench must be dug at a distance of at least 60 cm from the foundation. If there is a need to lay a cable through the foundation, then you will need to use an additional pipe in it. It is prohibited to pull conductive conductors directly under the foundation.
- When excavating a trench, the following distances should be maintained from various objects:
- 75 cm - bush plantings;
- 100 cm - sewerage, water supply;
- 200 cm - trees, gas pipeline.
- The cable must be armored and have appropriate insulation protection.
Supplying electricity to the house underground
The listed instructions are determined by the requirements of the PUE, PTE and SNiP, regardless of the selected cross-section of the current-carrying conductors.
The main advantage of this option for connecting a country house to a centralized power supply is the minimal cost of the required material. You can also do without using special equipment. Laying the power cable underground will be difficult if the area is tiled or concrete is poured.
Requirements for electrification
Conducting electricity to a plot of land with your own hands is a rather painstaking and complex task. But this way you can save a lot of money. Nowadays, many companies offer their services for connecting a summer cottage to the power grid, but in this case, prepare to pay two or even three times more than if you collected all the necessary documents and carried out installation work yourself.
Connecting electricity at the dacha
Before starting work on connecting electricity to your home or plot of land, you need to obtain the appropriate permission. Documents for carrying out work on the electrical supply of a summer cottage are a whole package of certificates and letters. We suggest you learn step by step how to proceed to prepare all the necessary documents :
- You should start by writing a letter to the company that provides electrification in your city or town, that is, the Distribution Zone. In this letter you must ask for technical conditions for connection. Here you also need to attach copies of documents according to which you are the owner of the house or land. If there is a gas pipeline and water supply pipes on the site, all this should be displayed on the site plan with the house. Depending on the company, additional certificates may also be needed; they are required on an individual basis;
- After you receive the terms of reference, on average a month later, you need to start developing a project for electrifying your site. Without appropriate education and experience, you should not develop it yourself. But if you are confident in your knowledge, then after drawing up this project, it will definitely need to be approved by the power supply organization. To save your time, it is better to immediately seek help from the design office or directly from the Distribution Zone. With this approach, you can be sure of compliance with all norms and standards in the finished project;
Electrical supply project: Scheme - Now that you have a ready-made power supply project for your summer cottage in your hands, you can begin electrical installation work. Be sure to strictly follow the approved project, otherwise you will have to redo everything all over again.
According to the Energy Law, there are several types of connection that any citizen of the Russian Federation can use, namely:
- The first type of connection limits consumption to 16 kW;
- The second type of connection limits consumption to 50 kW;
- The third type of connection limits consumption to 160 kW.
Unfortunately, at the moment, the last two types of connection are not available for domestic use, regardless of whether it is a summer cottage or a large residential building, so you need to focus on the first type of connection. No matter what kind of land or building you own, you can only connect a load up to 16 kW.
Photo - electrification of a suburban area
The price for such an electricity connection to your site will be from 550 rubles. This amount may vary upward depending on the individual project and the characteristics of a particular site. In particular, the amount is affected by the distance to the source of electricity. If this distance exceeds 500 meters, then you will have to pay an additional amount
In addition, if during operation or at the installation stage, a short circuit occurs due to your fault due to network overload, then you will be required to compensate for the cost of burnt equipment and supply wires. In practice, the larger the city or town, the higher the likelihood of network overload; areas in the Moscow region and the suburbs of St. Petersburg are most susceptible to this.
There is no price limit for connecting houses outside the city. Some well-known installation organizations offer you a quick connection to the power grid, with all the accompanying documents, for 300 or 500 thousand rubles under a special program.
Many owners of summer cottages without electricity, who have received permission to connect the power supply line to their property, also mention possible pitfalls. In particular, this is clear from the text of the correspondence with the energy supply company. This is an example text, which means that you will receive electricity only when repair work is carried out at a certain distribution station. Many who signed such a document wait years for connection, so be careful.
Photo - electricity supply to the site
It is worth remembering another very important point: in some localities electricity is limited, that is, it can only be spent within the established norm. In most cases, it reaches 3-6 kilowatts per hour. This is quite enough to supply a small home, but not enough to operate numerous power electrical appliances at the same time.
Video: conducting electricity and other utilities in a wooden house
Place of installation of the input panel and connection of the power cable
It is recommended to install the shield in an accessible place. This could be a corridor or a technical room, for example, a heating unit. It must be installed at a height of at least half a meter from the ground. Currently, you can easily purchase a shield of the required size. In this case, it is necessary to take into account the location for installing the meter and protective circuit breakers, including RCDs.
When inserting the power conductor into the panel, you will need to comply with the requirements of the electrical networks. The main thing is to lay a solid cable. When choosing its type, you should take into account the material from which the overhead power line wire is made, as a rule, it is aluminum.
Electrical panel in a wooden house
Further steps to connect to electricity
After obtaining permission and technical conditions, it is necessary to prepare an electrification project. You can do it yourself, but in the absence of special technical knowledge, this will be problematic. It is recommended to contact a specialist or order one from a resource supply company that carries out the relevant work.
The actual connection can also be done by specialists. You will need to install the meter on a special pole. And the connection to the network will be made by employees of the resource supply company, who will also seal the meter and draw up an act on connecting the new subscriber to the network.
Required safety standards
To ensure the electrical safety of installed wiring in a country house, the use of elements such as protective grounding, RCDs and automatic circuit breakers should be provided in advance.
Protective grounding
As mentioned earlier, in most cases, old four-wire power lines are used to power country houses. This means that a combined neutral and ground wire is used. If it breaks, life-threatening voltage may appear on the equipment housing. The machine will not turn off due to the rated current flowing through it. To eliminate such situations, it is necessary to install an additional grounding circuit on the site.
Design of a protective grounding loop
Note! To install a grounding system in a dacha, it is recommended to use factory-made modular-pin circuits. They can be installed in any type of soil without loss of performance.
RCD
Installing a residual current device allows you to ensure the safety of a person from electric shock, as well as prevent the development of a fire. The RCD reacts to leakage currents that are formed when the insulating coating of the cores is damaged or when the neutral wire breaks. It is recommended to mount the RCD directly at the power input.
The shutdown setting is selected taking into account the calculated leakage currents of all electrical equipment used in the country. The resulting value must be increased three times. RCDs with the following rated differential currents are available for sale: 10, 30, 100, 300 mA.
Connection diagram for RCDs and circuit breakers
Automatic circuit breakers
To protect cable lines from overload currents and short circuits, circuit breakers should be used. They are established for each individual consumer group. Selection is carried out in accordance with the calculated current consumption. As a rule, individual machines are mounted on lighting and socket networks.
Connection refusal and further actions
Network connection may be denied for the following reasons:
- not a complete package of documents has been submitted;
- the plan and list are drawn up incorrectly;
- documents were submitted to a company servicing a territory other than the declared one;
- there is no technical possibility.
In case of refusal, you can eliminate the reasons for the negative decision or go to court to appeal the actions or inaction of the organization.
Connecting a plot without buildings to the electrical network is carried out in exactly the same way as connecting a plot with buildings. It is necessary to perform a series of sequential actions, as well as identify and ensure technical feasibility. The cost of connection, if the established standards are not exceeded, will be only 550 rubles, but if the distance is exceeded, you will need to pay additionally for each unit of potentially consumed power and additional distance for connection.
Read: Privatization of leased land
Tools and material required for the work
To carry out work on installing country electrical wiring, it is recommended to prepare the following tools in advance:
- CL cutting scissors;
- pliers;
- screwdrivers;
- screwdriver;
- grinder with diamond discs;
- hammer;
- mounting chisel;
- putty knife;
- roulette;
- knife.
Tools for laying electrical wiring
It is best to purchase material after drawing up a full-fledged project of the planned electrical network. The following items will be required:
- circuit breakers;
- electric meter;
- wires;
- sockets;
- switches;
- distribution boxes;
- socket boxes;
- connection terminals;
- fastening hardware.
Final work
The final stage is testing the electrical network . They check not only the fully assembled wiring, but also as the circuits are installed.
- Each line is checked using a tester before connecting to the panel. Make it yourself from 2 pieces of wire, a socket and a low-power light bulb. The neutral and grounding of the line are connected to the panel directly, and the phase is connected in series through the control panel. If the light does not light up when you turn on the machine, everything is in order.
- If the light turns on, there is a short circuit on the line. It is necessary to turn off the machine and find the cause of the breakdown.
- Check each outlet, connecting a load to each. Each lamp needs to be ringed.
- The switches are closed - all the wires for them are connected and short-circuited.
- Then the entire group is loaded to the maximum to check the operation of the circuit breaker.
To make a test, you will need a special device - a multimeter or tester.
The nuances of laying current-carrying conductors
Do-it-yourself cable laying at the dacha is carried out in a certain sequence, taking into account important nuances for open and closed types of installation. At the initial stage, it is necessary to mark the installed channels. To do this, you can use a regular pencil. Further actions vary depending on the type of installation chosen.
Open laying
This type of wiring involves the use of remote switches, sockets and junction boxes. The cores are laid in special channels, which are mounted on top of the finishing material. In this case, fasteners are used for a specific type of wall surface. Subsequently, the channels are closed with a protective cover. The convenience of this method lies in the speed of installation and high maintainability.
To create an aesthetic appearance, the boxes should be laid under the ceiling. You can also use special floor skirting boards.
Hidden gasket option
To form hidden wiring in a suburban area, you will need to ditch the walls. To do this, use a grinder with diamond discs, a hammer drill or a wall chaser. Holes for distribution boxes, switches and sockets are made with appropriate crowns. Subsequently, the cables are laid in channels and fixed with putty or special staples. At the final stage, the walls are finished.
Installation of hidden wiring in foam concrete walls
Every person can carry out wiring in a summer cottage, even without special skills. The main thing is to follow electrical safety rules. At the final stage, you must make sure that the generated electrical wiring is working properly.
Installation of internal wiring
Electrical wiring in a country house is installed exactly according to the calculated diagram. You can’t replace something at the last moment and not take into account the difference in load. Installation is carried out in a certain order.
Marking
It is necessary to mark on the wall the location of all electrical points .
Use chalk and pencil. The location is chosen taking into account the standards of SNiP, PUE and your own convenience. It is recommended to immediately mark the location of the wire . After this, it is easier to calculate how much cable is actually required. The wiring is pulled along the walls. It is allowed to lay conductors on the floor if it is filled with cement screed and in this case the wire must be hidden in a corrugation to prevent mechanical damage.
Wall chipping
If installation is carried out openly or in a protective corrugation, it is enough to simply mark the position of the wiring on the wall.
If you want to hide the cable, you need to make grooves in the walls of the required depth and width - grooves. This can be done using a hammer drill with a chisel attachment, an angle grinder or a wall chaser, whatever you have on hand.
The marking lines mark the width of the groove. Usually it coincides with the depth. Using a wall chaser or a grinder with a disk cut the material along the boundaries of the groove ; if this is not enough for removal, make several more cuts inside the groove. Then take out the material and trim the groove with a chisel and hammer.
For sub-grids and junction boxes, holes in the wall are drilled with crowns - diamond or carbide-tipped. The standard sizes for the socket box are diameter 68 mm and depth 45 mm. But if non-standard types of modules are used, the dimensions of the holes will be different.
If modules with several sockets and switches are installed, several holes are drilled in a row, and the partitions between them are knocked out with a hammer drill or chisel.
Laying lines
At the dacha, wiring is most often installed in an open way. It is not necessary to use corrugation if you take a fairly well-insulated cable - VVG or VVGng, for example. To achieve a more aesthetic appearance, it is recommended to hide the wiring under the baseboard - floor or ceiling.
When laying hidden, the wiring is placed in grooves and fixed in them with putty, alabaster or special staples. The groove is filled completely with material.
Installation of junction boxes and sub-grids
Distribution boxes and socket boxes are mounted after laying the wires. Instructions are followed.
- Holes are drilled in the socket box for the power cable and auxiliary wires.
- The landing hole is coated with alabaster. Check: when you press on the bottom, the nest should not fall through.
- Coat it with alabaster on the outside of the socket box and insert it into the hole. The socket box should hold tightly. Alabaster dries in 2 hours, after which work can continue.
The distribution box can also be placed on alabaster. If the walls of the house are wooden, the shield is secured with screws and dowels.
Line connection
The connection of the socket and switch is carried out after finishing work, if any was carried out.
- In the junction box they find the zero, phase and supply wire of the circuit. The veins come in different colors, so it's easy.
- From a group of cables, find the one that is led from the installation site of the socket, switch, equipment and strip the ends. The cable cores are screwed into phase, neutral and power. Close the shield.
- Then the end of the cable that goes to the socket is cut into cores and the ends are stripped. The phase is connected to the first terminal of the socket, and the neutral to the second. The ground connection is connected to the connector in the middle of the socket.
- Insert the socket into the socket box, fix it with self-tapping screws and screws through the tabs. Then the decorative part is attached.
All connection and installation work is carried out when the power supply is disconnected.
D.C
The second way to transmit electric current to the consumer is direct current. Such a current is rectified. It is found in batteries, batteries, chargers. This current is still supplied to consumers in some countries, but in very small quantities. It is produced by solar panels. Direct current can be supplied through existing power lines and underground cables. The advantages of such a transfer are the following:
- There is no loss of power with distance. There is no need to increase the voltage at the power plant.
- Static stability has no effect on transmission and distribution.
- No need to configure frequency synchronization.
- Voltage can be transmitted through just one line with one contact wire.
- No influence of electromagnetic radiation.
- Minimum reactive power.
Direct current is not supplied to the consumer only because of the huge cost of equipment for power plants.
The conductivity of the electric current and the percentage of overestimation at the beginning of transmission largely depend on the resistance of the power line itself. The resistance, and thus the load, can be reduced by cooling to an ultra-low temperature. This would help increase the distance for energy transmission and significantly reduce losses. Today there is no technology for reducing the temperature of a power line. This technology is extremely expensive and requires major design changes. But in the regions of the far north, this method works quite well and greatly underestimates the percentage of power transfer and losses due to distance.
How to submit a list of documents and an application to an energy sales company
Documents are sent to the company by mail or courier. The processing time for the received application is 30 days, during which the applicant receives an agreement for connection to SNT with signatures of authorized persons.
The recipient must respond to the letter within a month. If the client refuses to provide services, he must justify the decision.